Metal Shingle Roof Installation: Ultimate 2025 Guide
Why Metal Shingle Roofs Are Built to Last a Lifetime
A metal shingle roof installation is a proven way to protect your South Florida home for 50 to 70 years or more, a significant upgrade from traditional asphalt shingles that last just 15 to 20 years. Metal shingles resist intense heat, hurricanes, fire, and saltwater corrosion, making them ideal for our coastal climate while cutting cooling costs and boosting curb appeal.
Quick Overview: Metal Shingle Roofs
- Lifespan: 50–70+ years
- Cost: Roughly 2–3x asphalt pricing, but a better long-term investment
- Climate Benefits: Reflects solar heat, reduces cooling costs, and withstands hurricane-force winds.
- Key Features: Class A fire rating, 100% recyclable, and available in styles that mimic traditional asphalt, wood shake, slate, or tile.
- DIY vs. Pro: DIY saves on labor but is complex and often voids warranties. Professional installation ensures a leak-free, long-lasting roof.
The installation process requires careful preparation of the roof deck and underlayment, precise layout, and correct fastening techniques to prevent leaks. Key challenges include cutting and flashing around valleys, ridges, and penetrations like pipes and vents.
As Filip Roegies, CEO of Gomez Roofing, I’ve overseen countless metal shingle roof installations across Broward, Palm Beach, and Miami-Dade counties. This guide walks you through every step so you understand what it takes to install a metal shingle roof correctly.
, cost per square foot ($6-8 vs $3-11), energy efficiency (reflects heat vs absorbs heat), fire rating (Class A vs varies), and maintenance requirements (minimal vs frequent) - metal shingle roof installation infographic")
Why Choose Metal Shingles for Your Home?
Metal shingles are an investment that keeps protecting your home long after traditional roofing materials have been replaced multiple times. The difference in longevity is striking: while asphalt shingles wear out in 15 to 20 years, a properly installed metal shingle roof installation delivers 50 to 70 years of protection. For many homeowners, this means installing one roof and never worrying about replacement again.
In South Florida’s heat, the energy savings add up quickly. Metal shingles reflect solar heat away from your home instead of absorbing it like asphalt. This translates to cooler attic temperatures, reduced strain on your air conditioner, and lower electric bills during our long, sunny summers.
Metal shingles are also a sustainable choice. They are often made from recycled materials and are 100% recyclable at the end of their long service life, unlike asphalt shingles that contribute millions of tons to landfills annually.
For peace of mind, metal shingles earn a Class A fire rating—the highest available—because they are non-combustible. In a state where lightning strikes are common, a roof that won’t ignite adds a critical layer of protection.
For more information on how we can help you with your metal roofing needs, check out our Residential Metal Roofing services.
Types, Colors, and Styles of Metal Shingles
Modern metal shingles can achieve almost any architectural look while delivering superior performance. The material, profile, and finish you choose allow for full customization.
-
Materials: Galvanized steel offers good value and corrosion resistance. Galvalume adds an aluminum-zinc coating for even better rust protection. Aluminum is lightweight and ideal for coastal areas with salt air. Copper and zinc are premium choices that develop a beautiful patina and can last over a century.
-
Profiles: You can choose profiles that replicate the look of traditional materials without the drawbacks. Shingle profiles mimic asphalt, shake profiles offer a rustic wood look, tile profiles match Mediterranean or Spanish clay, and slate profiles provide a refined appearance without the weight.
-
Color and Style: The right color and style can dramatically improve your home’s curb appeal and increase its value. A Spanish Colonial might use a terra cotta tile profile, while a modern home could feature a sleek charcoal shingle. With today’s metal shingle roof installation options, you no longer have to choose between appearance and performance—you get both.
Planning Your Metal Shingle Roof Project
A metal shingle roof installation is a significant investment, so careful planning is essential. Material costs for metal shingles typically range from $6.00 to $8.00 per square foot. Including labor, the total cost is roughly 2 to 3 times that of asphalt shingles. However, this upfront investment buys a roof that lasts 50 to 70 years, making it a smarter financial choice over the long term.
Several factors influence the final price:
- Roof Complexity: Roofs with many valleys, hips, dormers, or penetrations require more labor and custom flashing, increasing costs.
- Roof Size and Pitch: Larger roofs require more materials. Steeper pitches (7/12 or greater) require extra safety equipment and slower work, raising labor rates.
- Material Choice: Galvanized steel and aluminum are more affordable, while copper and zinc are premium options. Different finishes and profiles also affect the price.
- Existing Roof Condition: If you can install over a single, flat layer of existing asphalt shingles, you’ll save on tear-off costs. Damaged or multi-layered roofs require a complete tear-off, which adds labor and disposal fees.
Here’s a breakdown of typical material costs:
| Material Type | Estimated Cost Per Square Foot (Materials Only) |
|---|---|
| Steel | $4.50 – $15.00 |
| Aluminum | $4.00 – $8.00 |
| Copper | $5.00 – $10.00 (raw) up to $15-$30+ (finished) |
| Zinc | $8.00 – $10.00 |
These are ballpark figures and can vary based on market conditions and specific products.
Essential Tools and Materials for a DIY metal shingle roof installation
While we recommend professional installation, knowing the required tools and materials is helpful.

- Essential Tools: A tape measure, chalk line, torque-limiting screw gun, aviation snips or metal shears, caulking gun, and a full safety harness with fall protection are non-negotiable. You’ll also need gloves, safety glasses, a utility knife, and a rubber mallet.
- Required Materials: Beyond the metal shingles (order 10-15% extra for waste), you’ll need underlayment (#30 felt or synthetic), fasteners designed for metal roofing, and quality sealant. Finishing pieces are also critical: starter strips, ridge caps, gable trim, and various flashing components for valleys, pipes, and vents.
Preparing the Roof Deck and Underlayment
Proper preparation is the foundation of a long-lasting roof.
First, inspect the roof deck for any rotten, soft, or damaged plywood. Replace any compromised sections to ensure a smooth, solid base. Even small bumps can telegraph through the metal shingles.
Next, decide on a tear-off. Metal shingles can often be installed over a single layer of asphalt shingles if the old roof is flat. This saves on labor and disposal. However, if the existing roof is buckled, has multiple layers, or is badly worn, a complete tear-off is necessary.
Finally, install the underlayment. At a minimum, use #30 felt or a synthetic equivalent. For low-pitch roofs (3/12 or less) or in areas prone to ice dams, apply a self-adhering ice and water shield at eaves, valleys, and around penetrations. Start at the eaves and work up, overlapping all seams to ensure water sheds properly. Secure the underlayment with plastic cap nails. For more technical guidance, consult a comprehensive Metal Roof Installation Manual.
Taking your time during preparation is the best way to ensure your new roof performs for decades.
A Step-by-Step Guide to Metal Shingle Roof Installation
With planning and preparation complete, the metal shingle roof installation can begin. This process demands precision to create a roof that will last for decades.

First, ensure safety. Always wear gloves, safety glasses, and non-slip shoes. On any steep or high roof, a safety harness and fall protection system are essential. Never work on a wet roof.
Next, establish a square layout. Snap a chalk line along the gable end, ensuring it is perfectly square with the eave. Using the 3-4-5 triangle method (a 3-foot vertical line and a 4-foot horizontal line should create a 5-foot diagonal) guarantees your shingle courses will be straight.
Install starter strips along the eave. These strips lift the first course of shingles to the correct angle and prevent water from wicking underneath. Then, lay the first course, starting from one side and ensuring the panel overhangs the eave by about 1 inch. This first row sets the alignment for the entire roof.
Most modern metal shingles feature an interlocking design, where each panel locks into its neighbors on the side and the course below. A staggered pattern, achieved by starting successive courses with partial shingles, improves both the roof’s appearance and its wind resistance.
Modern systems favor concealed fasteners, where screws are hidden by the overlapping shingle. This provides a cleaner look and superior protection against water intrusion, which is crucial in hurricane-prone South Florida.
Best Practices for Fastening and Securing Shingles
Proper fastening is critical and a common point of failure in DIY installations. Use only manufacturer-specified fasteners. Drive screws to compress the rubber gasket until it forms a snug, watertight seal, but do not overtighten. Over-tightening can crack the gasket or deform the metal, creating a leak point. Follow the manufacturer’s specified fastener patterns precisely, as these are engineered for wind resistance. Some systems use nailing clips that allow for thermal expansion and contraction. For more details, see our Roof Installation and Repair process.
Flashing Roof Penetrations and Edges
Flashing directs water away from vulnerable areas where the roof is interrupted. This is essential for a leak-free metal shingle roof installation.

- Valleys: Install a continuous W-shaped valley flashing where two roof planes meet to channel water flow.
- Hips and Ridges: Use specially formed hip and ridge caps to cover the external angles and peak of the roof. These can be integrated with ventilation products.
- Eaves and Gables: Drip edge flashing at the eaves directs water into gutters, while gable trim covers the sloped edges of the roof.
- Pipes, Vents, and Skylights: Each penetration requires a specific flashing kit (e.g., a pipe boot or a multi-part skylight flashing system) that must be installed and sealed correctly to prevent leaks.
- Chimneys: This is the most complex flashing job, often requiring a groove cut into the masonry (a reglet) to insert counter-flashing for a watertight seal.
High-quality elastomeric or butyl sealants are used at all flashing joints, panel overlaps, and around fasteners to ensure a durable, watertight system.
Common Mistakes to Avoid During Your metal shingle roof installation
Avoiding these common errors is key to a successful installation:
- Improper Fastening: Over- or under-tightening screws creates leak points.
- Incorrect Overlaps: Failing to follow manufacturer specifications for panel overlaps allows water intrusion.
- Poor Flashing: Inadequate sealing or incorrect installation of flashing is a leading cause of roof leaks.
- Inadequate Underlayment: Skipping underlayment or using the wrong type compromises the roof’s secondary water barrier.
- Ignoring Thermal Expansion: Not allowing for the metal’s natural movement can cause panels to warp or “oil can.”
- Leaving Metal Shavings: Tiny metal filings from cutting will rust and stain the roof if not swept away immediately.
- Not Squaring the Roof: An improper layout at the start will result in crooked courses and potential gaps.
Advanced Considerations and Long-Term Maintenance
A metal shingle roof installation is built for longevity, but understanding a few key factors will help protect your investment, especially in South Florida’s demanding climate.
Climate Challenges
Metal shingle roofs are uniquely suited for Florida’s weather. Their interlocking design and engineered fastening patterns can withstand hurricane-force winds up to 190 kph (118 mph) or more, a critical feature for homeowners in Broward, Palm Beach, and Miami-Dade Counties. Unlike asphalt shingles that absorb the sun’s heat, metal shingles reflect it. This keeps your attic cooler, reduces your cooling costs, and the durable Kynar 500® or Hylar 5000® PVDF finishes resist fading and chalking from intense UV exposure.
Installing Over Existing Asphalt Shingles
In many cases, you can install a metal shingle roof over a single layer of existing asphalt shingles. This practice, known as a “roof-over,” saves on the cost and mess of a tear-off. However, this is only advisable if the existing roof is relatively flat and in good condition. Any imperfections in the old roof can telegraph through the new metal. Before proceeding, a professional should nail down any loose shingles, remove old drip edges, and install a fresh layer of underlayment to create a clean, dry surface.
Maintenance Requirements
Metal roofs are low-maintenance, but not no-maintenance. A little proactive care ensures a 50+ year lifespan.
- Annual Inspection: Each spring, perform a visual check from the ground for any loose trim or obvious damage. After a major storm, check for any issues.
- Debris Removal: Use a leaf blower or soft-bristle brush to clear leaves, twigs, and other debris from valleys and around chimneys to prevent moisture buildup.
- Cleaning: If needed, wash the roof with a mild, biodegradable cleaner and rinse thoroughly. Avoid pressure washers and abrasive solvents that can damage the finish.
- Check Sealants: During your inspection, check the sealant around flashings (pipes, vents, etc.) and touch up any cracked or dry spots with fresh elastomeric sealant.
- Gutters: Keep gutters and downspouts clear to ensure proper water drainage away from your home’s foundation.
For answers to other common roofing questions, our FAQ page is a great resource.
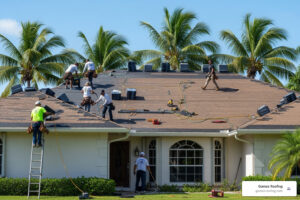
DIY vs. Professional Installation: Making the Right Choice
While a DIY metal shingle roof installation may seem like a way to save on labor costs, it’s a project where professional expertise is invaluable. Improper installation is a common issue we see, leading to leaks, water damage, and costly repairs that often exceed the initial savings. Metal roofing requires precision with every fastener, overlap, and piece of flashing—skills that take years to master.
Furthermore, most manufacturers require professional installation to validate their product warranties. A DIY job could void the 50-year warranty you’re counting on. Safety is another major concern; professional roofers have the training and equipment to work safely at heights, mitigating the serious risks involved.
Hiring a professional contractor like Gomez Roofing ensures your roof is installed correctly by a team that understands the engineering behind each system. For homeowners in Broward, Palm Beach, and Miami-Dade counties, this means your roof will meet local building codes and hurricane standards. Professional installation comes with both a manufacturer’s material warranty and a contractor’s workmanship warranty, giving you complete peace of mind. Learn more About Us and why South Florida homeowners trust us with their most important asset.
Understanding Roofing Warranties
Warranties are a critical part of your roofing investment, but it’s important to know what they cover. There are two main types:
-
Material Warranty: This comes from the manufacturer and covers defects in the metal shingles themselves, such as premature fading or corrosion. These warranties often last 30 to 50 years, but almost always require professional installation to be valid. A non-prorated warranty is best, as it means the coverage value doesn’t decrease over time.
-
Workmanship Warranty: This is provided by your contractor and covers the installation itself. A reputable contractor will offer a warranty of 5 to 25 years, protecting you against leaks or other issues caused by installation errors. This is your assurance that the job was done right.
When planning your project, ask about transferable warranties. The ability to transfer the remaining warranty to a new homeowner can be a powerful selling point and add tangible value to your property. Always read the fine print to understand what is covered, what is excluded, and what maintenance is required to keep your warranties in effect.
Conclusion
A metal shingle roof installation is more than a roofing choice; it’s a long-term commitment to your home’s protection and value. With a lifespan of 50-70 years, a metal roof offers peace of mind that your neighbors replacing their asphalt shingles simply won’t have. It stands strong against Florida’s hurricanes, reflects heat to lower cooling costs, and improves your home’s curb appeal.
We’ve covered the planning, materials, and detailed installation steps, highlighting why precision and experience are non-negotiable. The process, from preparing the underlayment to flashing every penetration, requires professional skill to ensure a watertight, durable result. You can achieve the classic look of slate, the rustic charm of wood shake, or the clean lines of traditional shingles, all with the unbeatable performance of metal.
For a professional consultation and expert metal shingle roof installation in South Florida, explore our Residential Metal Roofing services. After more than a decade serving homeowners throughout Broward, Palm Beach, and Miami-Dade Counties, we know what it takes to deliver a flawless installation that you can count on for decades. Give your home the roof it deserves.